Mini-Split Line Set Length and Charge: When to Add Refrigerant
Mini-splits are charged by weight, not by superheat or subcooling. Getting line length and charge right is a big part of a good install.
How pre-charge works
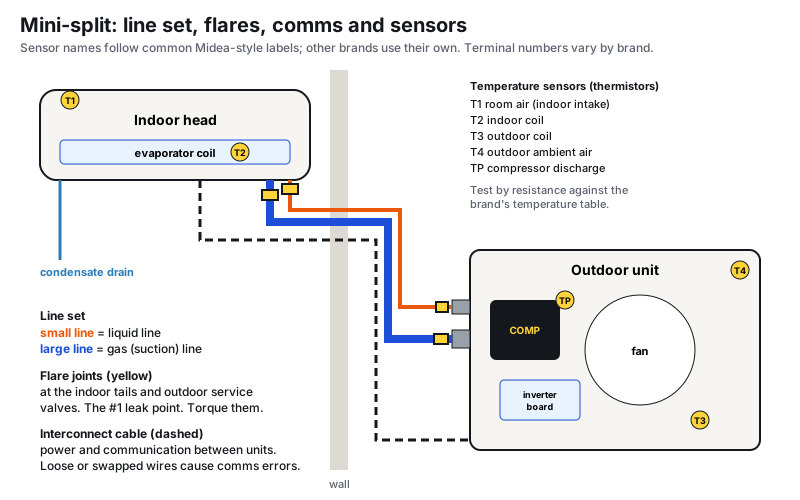
The outdoor unit ships holding enough refrigerant for the unit plus a standard line set length, printed on the data plate and in the installation manual. Many units cover somewhere around 15–25 feet, but always check the actual number for your unit.
Calculating additional charge
Additional charge = (actual line length − pre-charged length) × charge rate
- The charge rate comes from the manual, usually as ounces per foot (or grams per meter), based on the liquid line size.
- Measure one-way line length, routed as installed, not the straight-line distance.
- Example: pre-charged for 25 ft, actual run 40 ft, rate 0.2 oz/ft → 15 ft × 0.2 = 3 oz added. (Example numbers only; use your unit's values.)
- Use the unit converter if the manual lists grams and meters.
Short line sets
Many manufacturers specify a minimum line length (often around 10 feet). Going shorter can cause noise, oil return problems or overcharging. Some manuals tell you to remove refrigerant for very short runs. Follow the manual.
Length and height limits
- Maximum total length per indoor unit, and on multi-zone systems, a maximum combined length.
- Maximum height difference between indoor and outdoor units, which can differ depending on which unit is higher.
- Exceeding limits can starve the indoor unit, hurt oil return and void the warranty.
Charging procedure
- Pressure test with nitrogen, then evacuate and decay test.
- With the system in a vacuum, weigh in the additional charge using a refrigerant scale, as liquid for blends like R-410A and R-454B.
- Open the service valves per the manual to release the factory charge.
- Record the total added charge on the unit's label.
- Verify operation with the manufacturer's test mode. Many inverter systems don't have meaningful superheat/subcooling targets under normal operation, so don't use gauges to trim the charge unless the manual gives a procedure.
Worked example: multi-zone
A two-zone outdoor unit pre-charged for 50 ft total, with 25 ft to head A and 40 ft to head B (65 ft total), and a manual charge rate of 0.16 oz/ft on 1/4" liquid lines:
- Total installed length: 25 + 40 = 65 ft.
- Over the pre-charged length: 65 − 50 = 15 ft.
- Additional charge: 15 × 0.16 = 2.4 oz.
Some multi-zone manuals use a different method: a charge per foot beyond a per-zone allowance, or different rates by line size. Follow the manual exactly; these numbers are only to show the math.
Line set sizing and routing
| Do | Why |
|---|---|
| Use the line sizes in the manual for that capacity | Wrong sizes change pressure drop, oil return and charge |
| Insulate both lines separately | On heat pumps the gas line is hot in heating and cold in cooling |
| Avoid sags and long traps in the gas line | Oil can pool and starve the compressor |
| Use bend radii the tubing can handle, or a bender | Kinks restrict flow and are a common cause of poor capacity |
| Coil excess line horizontally if you must keep it | Vertical coils can trap oil |
| Seal the wall penetration and use a line set cover outside | Keeps water, pests and UV off the insulation |
Recording the charge
Write the total additional charge, the line length, and the date on the unit's charge label or service sticker. The next tech who works on it needs those numbers to know the correct total charge. Many manufacturers also require this record for warranty. Use the startup and commissioning checklist to keep it with the job file.
Common mistakes
- Measuring straight-line distance instead of the routed length.
- Adding charge "by feel" or by pressure on an inverter system.
- Forgetting multi-zone total limits: each line may be within its limit while the total isn't.
- Leaving extra line coiled vertically behind the unit.
- Not pressure testing the flares before evacuating. See mini-split flare connections.
FAQ
How long can a mini-split line set be?
It depends on the model. Check the installation manual for the maximum total length and maximum height difference. Smaller wall units often have shorter limits than larger systems.
Do I need to add refrigerant to a mini-split?
Only if the line set is longer than the length the unit is pre-charged for, or if you're repairing a leak. Use the manufacturer's charge rate per foot and weigh it in.
Can I charge a mini-split by pressure?
Generally no. Inverter systems change speed constantly, so pressures don't map to charge the way they do on fixed-speed systems. Charge by weight per the manual.
Sources
One field tip a week
A short, practical HVAC tip in your inbox every week: diagnostics, charging, airflow and code changes. Free, unsubscribe anytime.
We'll only use your email for the newsletter. Privacy policy.
Tools for this job
Related guides
Mini-Split Not Cooling or Heating: A Diagnostic Order for Ductless Systems
How to troubleshoot a ductless mini-split that runs but won't cool or heat: error codes, mode and remote settings, filters and blower wheels, the outdoor unit, sensors, communication and charge.
Mini-Split Flare Connections That Don't Leak: Cutting, Flaring and Torque
The steps that keep mini-split flare joints leak-free, from cutting and deburring to flare size, oil, torque and nitrogen testing.
How to Clean a Mini-Split: Filters, Coil, Blower Wheel and Drain
How to deep clean a ductless mini-split indoor unit, including the coil, blower wheel and drain, plus the outdoor unit, with the right tools and without damaging the electronics.
How to Test a Mini-Split Thermistor (Temperature Sensor)
Test a mini-split room, coil, discharge or outdoor temperature sensor with an ohmmeter and the manufacturer's resistance table, and find out whether the sensor, wiring or board is bad.
Field reference for trained technicians. Always follow the equipment manufacturer's instructions, local code and safe work practices. See our editorial standards, or report a correction.