Mini-Split Flare Connections That Don't Leak: Cutting, Flaring and Torque
Most mini-split leaks happen at the flare connections. Nearly all of them come down to prep or torque, so here's the process that prevents them.
1. Cut and deburr
- Use a tubing cutter, not a hacksaw, and keep the cut square.
- Ream the inside burr with the tube pointed down so chips fall out, not into the line.
- Don't over-ream; thinning the wall weakens the flare.
- Keep line set ends capped until you connect them.
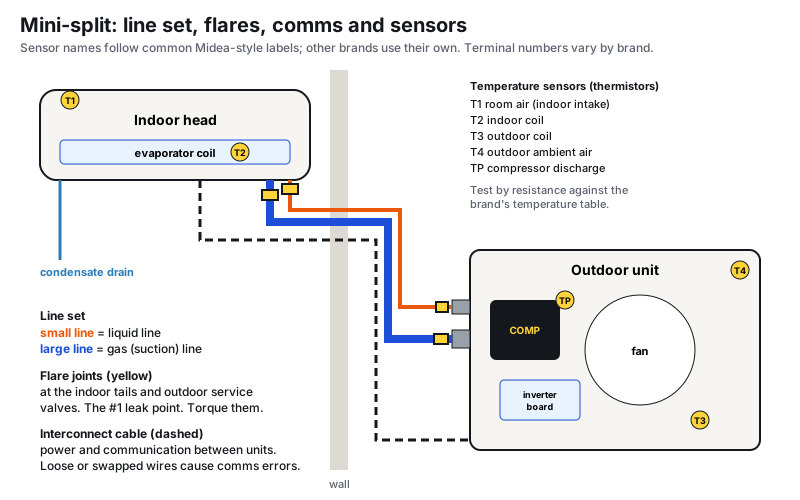
2. Flare nut first
Slide the flare nut onto the tube before you flare. Use the nuts that came with the unit, which fit the flare dimensions the manufacturer designed for.
3. Make the flare
- Use an eccentric (orbital) flaring tool with the right die for the tubing size. Many installers prefer a tool with a clutch that stops at the correct flare.
- Set the tube height in the bar as the tool's instructions say.
- Check the finished flare: smooth, even, no cracks or splits, uniform thickness, sized so it seats fully in the nut without binding on the threads.
4. Oil (if allowed)
Many techs put a drop of refrigerant oil on the back of the flare (where the nut rides) and the threads so the nut turns smoothly and the flare seats without galling. Follow the manufacturer's instructions; some specify oil type or say not to use any. Never use a thread sealant on the flare face unless the manufacturer specifies it.
5. Torque to spec
Hand-tighten until the flare seats, then tighten with a torque wrench and crowfoot or flare-nut adapter to the manufacturer's torque value for that tube size (it's in the installation manual). Too loose leaks; too tight cracks the flare or distorts the nut. Hold the fitting body with a backup wrench.
6. Pressure test, then evacuate
Pressure test with dry nitrogen to the manufacturer's test pressure and check every flare with bubble solution. Watch for any pressure drop. Then pull a deep vacuum with a micron gauge and decay test.
Alternatives
Some manufacturers allow brazed connections or listed mechanical press or quick-connect fittings in place of flares. Use only what the installation instructions permit, especially on A2L systems.
Why flares leak
Most flare leaks come from a few causes, and almost all are preventable:
| Cause | How to prevent it |
|---|---|
| Burr or chip on the tube end | Cut with a tubing cutter, ream, and point the tube down while deburring so chips fall out |
| Flare too small or off-center | Use a flaring tool made for refrigerant (often an eccentric cone, clutch type) and the right die setting |
| Scratched or dirty flare face | Keep caps on until you connect; wipe the face clean before assembly |
| Under-torqued | Use a torque wrench and the manufacturer's value for that tube size |
| Over-torqued or cracked flare | Same: torque wrench, not "feel" |
| Forgetting the flare nut | Put the nut on before flaring (it happens to everyone once) |
| Re-using an old flare | Cut it off and make a new one |
Tools that make better flares
- A clutch-type eccentric cone flaring tool stops at the right depth and burnishes the flare face.
- A flare gauge checks the flare's outside diameter against the size it should be.
- A torque wrench with crowfoot adapters in the right sizes for 1/4", 3/8", 1/2" and 5/8" flare nuts.
- A backup wrench on the fitting body so you don't twist the copper.
Leak checking flares properly
- Nitrogen pressure test to the manufacturer's test pressure. Many techs leave it for at least 15 minutes and watch the gauge.
- Bubble every flare, including the indoor unit tails, which are often hidden behind the head. Use a mirror or camera.
- After charging, check again with an electronic leak detector. Some leaks only show at operating pressure or temperature.
- On service calls, an oily, dirty spot at a flare is a strong hint. Clean it and re-check.
Common mistakes
- Using oil not allowed by the manufacturer. Some instructions call for a drop of refrigerant oil on the flare back; some forbid any oil. Follow the installation manual.
- Using thread sealant or tape on flares. Flares seal metal to metal. Sealants can contaminate the system and hide a bad flare.
- Skipping the pressure test because "it's a new unit." The flares you made are the weakest point in the system.
- Making the indoor connection inside the wall. Flares must stay accessible for inspection.
FAQ
Should I use refrigerant oil on mini-split flares?
Many manufacturers and trainers recommend a little refrigerant oil on the back of the flare and threads. Follow the installation instructions for the unit.
How tight should a mini-split flare nut be?
Use the torque values in the manufacturer's installation manual for each tube size, with a torque wrench. Guessing by feel is a leading cause of flare leaks.
Can I reuse a flare?
Re-cutting and making a fresh flare is the safer practice. A flare that has already been tightened has been deformed to that fitting.
Sources
One field tip a week
A short, practical HVAC tip in your inbox every week: diagnostics, charging, airflow and code changes. Free, unsubscribe anytime.
We'll only use your email for the newsletter. Privacy policy.
Tools for this job
Related guides
Mini-Split Not Cooling or Heating: A Diagnostic Order for Ductless Systems
How to troubleshoot a ductless mini-split that runs but won't cool or heat: error codes, mode and remote settings, filters and blower wheels, the outdoor unit, sensors, communication and charge.
Mini-Split Line Set Length and Charge: When to Add Refrigerant
How factory pre-charge works on mini-splits, how to calculate additional charge for long line sets, and the limits on length and height.
How to Find a Refrigerant Leak: Methods, Common Spots and the Standing Pressure Test
A step-by-step leak search for AC and heat pump systems, the leak detection methods and where each works best, the most common leak spots, and how to confirm the repair.
How to Clean a Mini-Split: Filters, Coil, Blower Wheel and Drain
How to deep clean a ductless mini-split indoor unit, including the coil, blower wheel and drain, plus the outdoor unit, with the right tools and without damaging the electronics.
Field reference for trained technicians. Always follow the equipment manufacturer's instructions, local code and safe work practices. See our editorial standards, or report a correction.