How to Find a Refrigerant Leak: Methods, Common Spots and the Standing Pressure Test
Adding refrigerant without finding the leak brings the call back and puts refrigerant into the air. A methodical search usually finds it in under an hour.
Safety: Never use oxygen or compressed air to pressurize a system. Use dry nitrogen with a regulator, and never exceed the test pressure on the unit's data plate. A2L refrigerants (R-454B, R-32) are mildly flammable: ventilate and remove ignition sources while searching.
Confirm it's a leak
Low charge looks like:
- High superheat and low subcooling together on a TXV or piston system
- Low suction pressure with normal airflow
- A history of "topped off last year"
Rule out airflow problems and restrictions first; they can look like low charge. See superheat vs. subcooling.
The methods and where each works
| Method | Best for | Watch out for |
|---|---|---|
| Electronic detector (heated diode or infrared) | Fast sweep of a whole system | Wind outdoors; contamination of the sensor; needs to be rated for A2L refrigerants on newer systems |
| Bubble solution | Pinpointing a suspected spot | Very small leaks take time; use a solution made for leak detection |
| Standing pressure test with nitrogen | Proving a leak exists; finding which section | Temperature changes move the reading; keep below the data plate test pressure |
| Ultrasonic detector | Pressurized leaks in noisy places | Less sensitive to tiny leaks |
| UV dye | Slow, intermittent leaks | Only where the equipment manufacturer allows it; some don't |
| Hydrogen/nitrogen trace gas (5% hydrogen) | Very small leaks, with a hydrogen detector | Needs the matching detector |
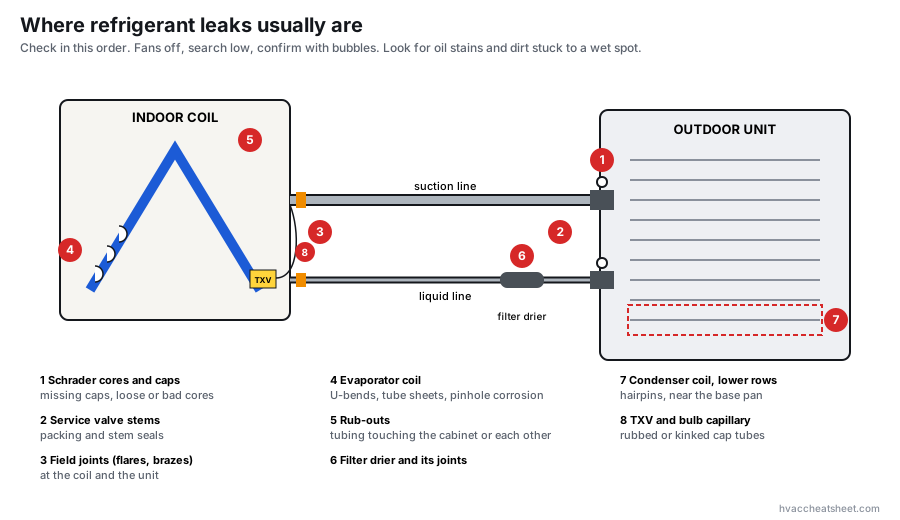
Where leaks usually are
Check these first, roughly in order:
- Schrader valve cores and caps. Missing caps, loose or damaged cores.
- Flare connections, especially on mini-splits and some line sets. See flare connections that don't leak.
- Service valve stems and packing.
- Evaporator coil: tube sheets, U-bends and return bends. Copper coils can develop pinhole corrosion leaks.
- Rub-outs: lines or capillary tubes rubbing on the cabinet, each other, or a bracket.
- Braze joints, especially field joints and the filter drier.
- Condenser coil: hairpins and the bottom rows near the base pan.
- TXV sensing bulb capillary and pressure switch connections.
Look for oil stains, dirt stuck to a wet spot, and green corrosion at copper joints.
Step by step: searching a charged system
- Turn the system off so fans don't blow refrigerant away from the leak.
- Check caps and cores with bubbles.
- Sweep with the electronic detector, moving the tip slowly (about an inch per second) and close to the joint. Search low, since most refrigerants are heavier than air.
- Search the indoor coil: pull the coil door or access panel and sweep the tube sheets and bends. If you can't reach inside, sniff the condensate drain outlet and the supply registers right after shutdown.
- Confirm with bubbles wherever the detector alarms.
Step by step: standing pressure test
If you can't find it charged, or after a repair:
- Recover the refrigerant with recovery equipment rated for that refrigerant.
- Pressurize with dry nitrogen through a regulator, below the low-side test pressure on the data plate. Many techs test in stages, checking for big leaks at a lower pressure first.
- Record the pressure and temperature, then wait. Pressure changes with temperature, so a unit in the sun will rise and fall. A steady drop at a steady temperature is a leak.
- Isolate sections to narrow it down: close the service valves to separate the outdoor unit from the line set and indoor coil, and test each side.
- Bubble every joint on the side that loses pressure. Higher pressure makes small leaks easier to find with bubbles and ultrasonic detectors.
After the repair
- Pressure test the repair with nitrogen.
- Replace the filter drier if the system was open or wet.
- Evacuate to a deep vacuum and do a decay test. See how to pull a deep vacuum.
- Weigh in the charge, then verify with superheat or subcooling.
- Record the leak, the repair and the refrigerant added on the refrigerant service log. Larger systems can have leak repair and recordkeeping rules; see HFC rules for technicians.
Common mistakes
- Topping off without searching. The customer pays again next summer.
- Searching with the fans running.
- Not checking valve caps and cores first, the easiest and most common leak.
- Over-pressurizing with nitrogen beyond the data plate test pressure.
- Calling a standing test good after 10 minutes. Small leaks need time, and temperature changes can hide a drop.
- Using a detector that isn't rated for A2L refrigerants on R-454B or R-32 systems.
FAQ
How do I know if my AC is low on refrigerant?
Low suction pressure, high superheat and low subcooling with good airflow are the signs. Warm air or a frozen coil alone isn't proof; airflow problems cause both.
Can a refrigerant leak fix itself?
No. Some leaks only show at certain temperatures or pressures, so they seem to come and go, but the refrigerant keeps leaving.
Is it worth repairing an evaporator coil leak?
It depends on the coil's age and warranty, the cost of the coil versus the system, and the refrigerant. Many shops replace a leaking coil rather than patch it.
Sources
One field tip a week
A short, practical HVAC tip in your inbox every week: diagnostics, charging, airflow and code changes. Free, unsubscribe anytime.
We'll only use your email for the newsletter. Privacy policy.
Related guides
Servicing R-22 Systems in 2026: Recharging, Retrofits and Repair-or-Replace
What you can and can't do with an R-22 air conditioner or heat pump today, where R-22 comes from now, how retrofit refrigerants work, and how to help a customer decide between repair and replacement.
AC Short Cycling: Why the Compressor Turns On and Off Too Often
How to diagnose an air conditioner or heat pump that short cycles, using how long it runs and what stops it: thermostat problems, safety switches, low charge, airflow, and oversizing.
AC Not Cooling? A Step-by-Step Diagnostic Checklist for Techs
Work an AC no-cool call in the right order, from the thermostat call to airflow, electrical and refrigerant charge, without guessing.
Mini-Split Not Cooling or Heating: A Diagnostic Order for Ductless Systems
How to troubleshoot a ductless mini-split that runs but won't cool or heat: error codes, mode and remote settings, filters and blower wheels, the outdoor unit, sensors, communication and charge.
Field reference for trained technicians. Always follow the equipment manufacturer's instructions, local code and safe work practices. See our editorial standards, or report a correction.